The Ultimate Indie Game Boothing Plan
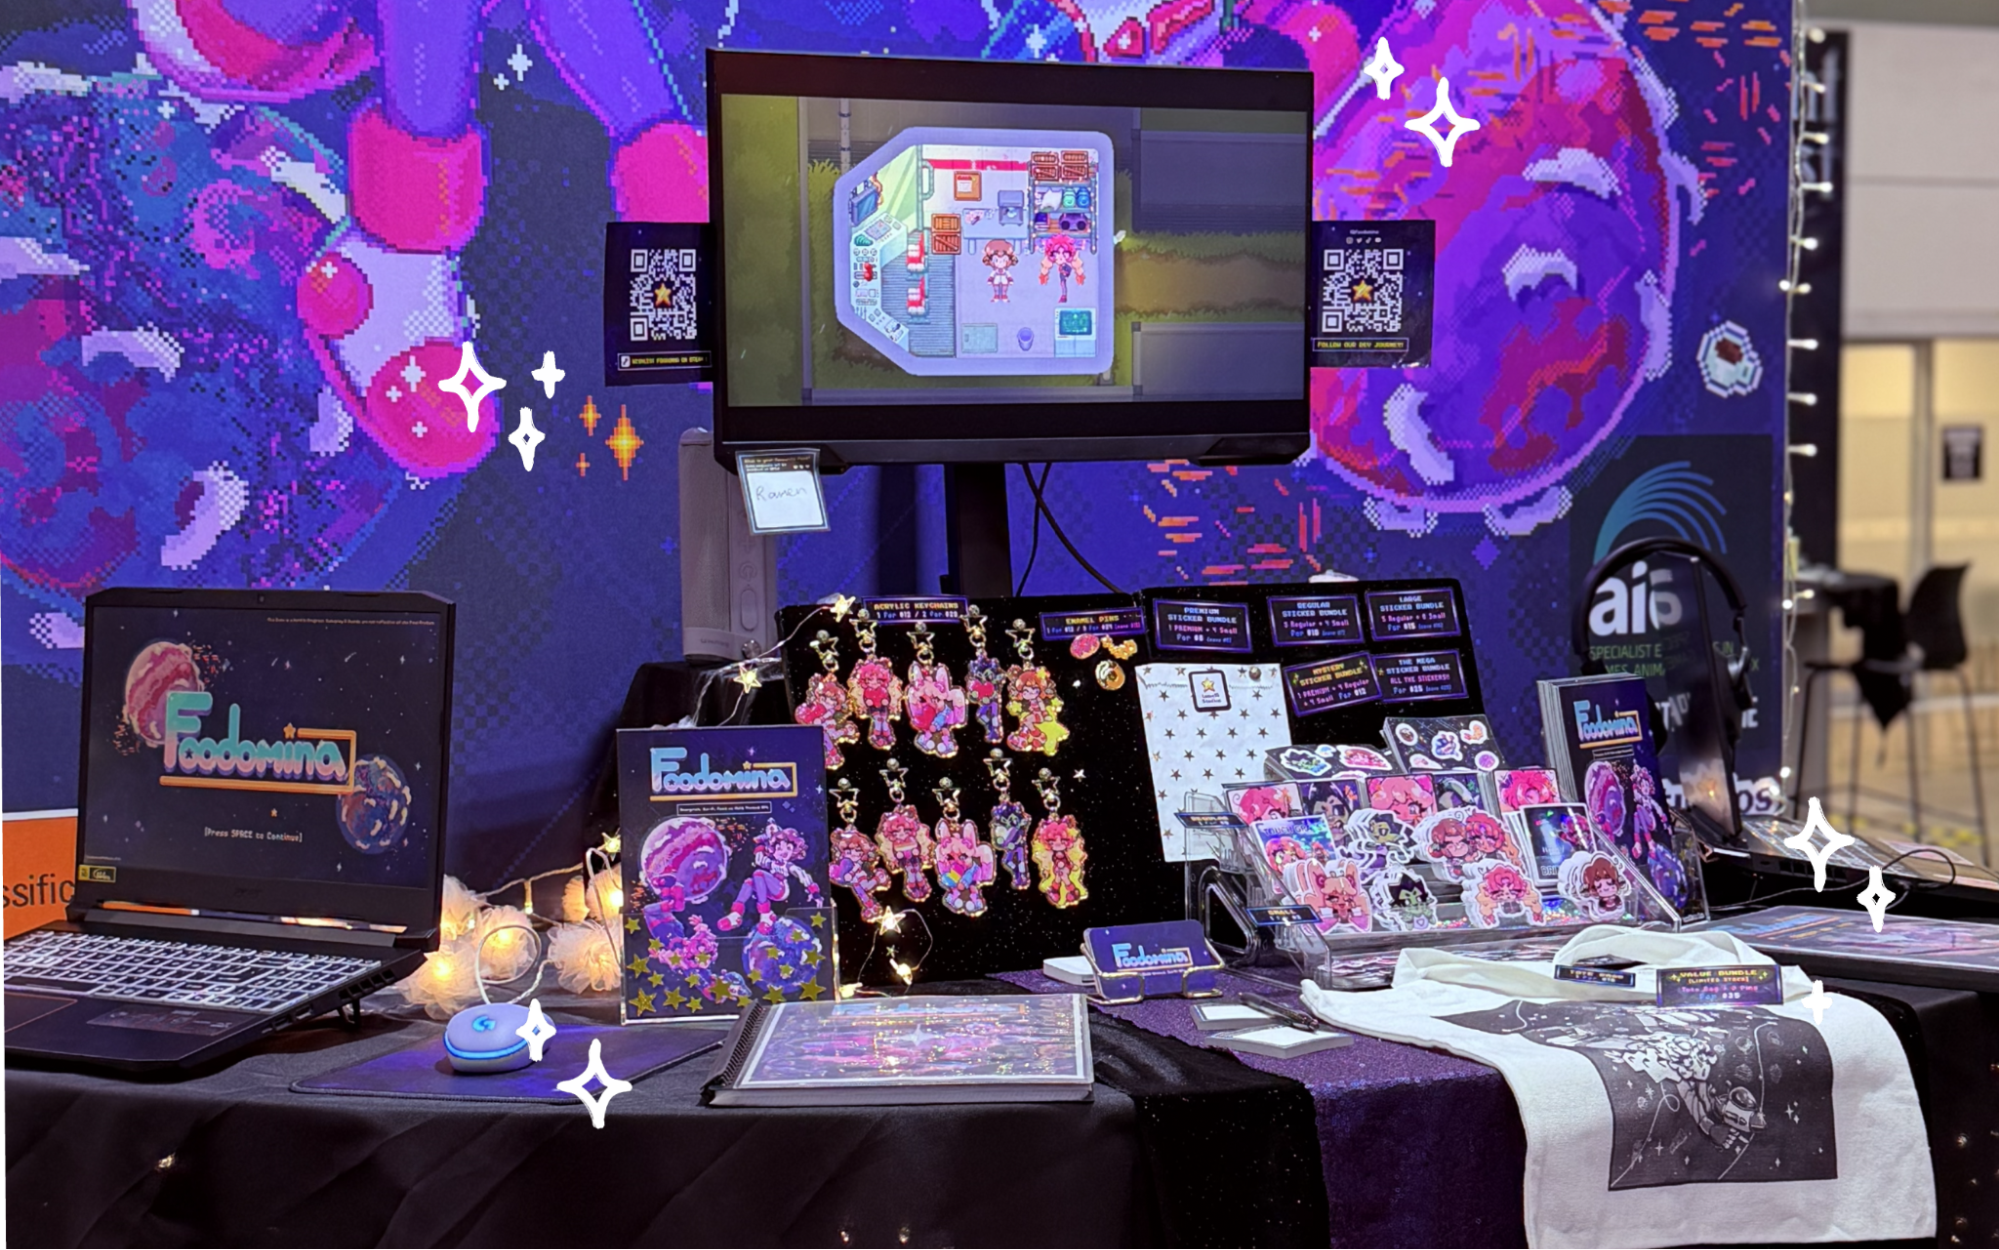
Foodomina booth (Source: Supplied)
The never-ending narrative that comes with being a game developer, especially an indie one, is the curse of needing to wear an infinite amount of hats to create a game. That does not become truer than when you need to channel your inner artist alley boother to showcase your game at physical events, expos, and cons, to give your beloved little craft exposure to gamers who will love it!
Game exhibitions can remind us exactly why we work so hard creating what we create. Witnessing the joy that grows from gamers playing your game makes it all worth it. That’s not even including all the other opportunities events can offer, like merch income, market validation, player data… the list goes on.
But boothing is easier said than done, and can be especially risky with how much they can cost, on top of not getting the reception you were hoping for. To prevent such an outcome you need to prepare a solid foundation.
I’m Irini, and I am directing the development of a story rich, food-themed RPG. I’ll be sharing with you the exact guide and structure that turned me and my team from stressed hermit devs, into prepared, confident and excited devs ready to share our game with the world, and make a show stopping impression every time!
Of course, it’s customary for me to do so through food metaphors, so let’s get into it.
The Onion of Preparation:
Where do we start?
At the centre of boothing is simply showcasing your game with a fabulous booth at an event. But to get to that centre, we have to work through layers of planning that will bring us to that ultimate goal: being fully equipped to make the most of it. Each layer relies on the information and resources of the previous to make planning your booth the easiest it can be!
The Outer Layer:
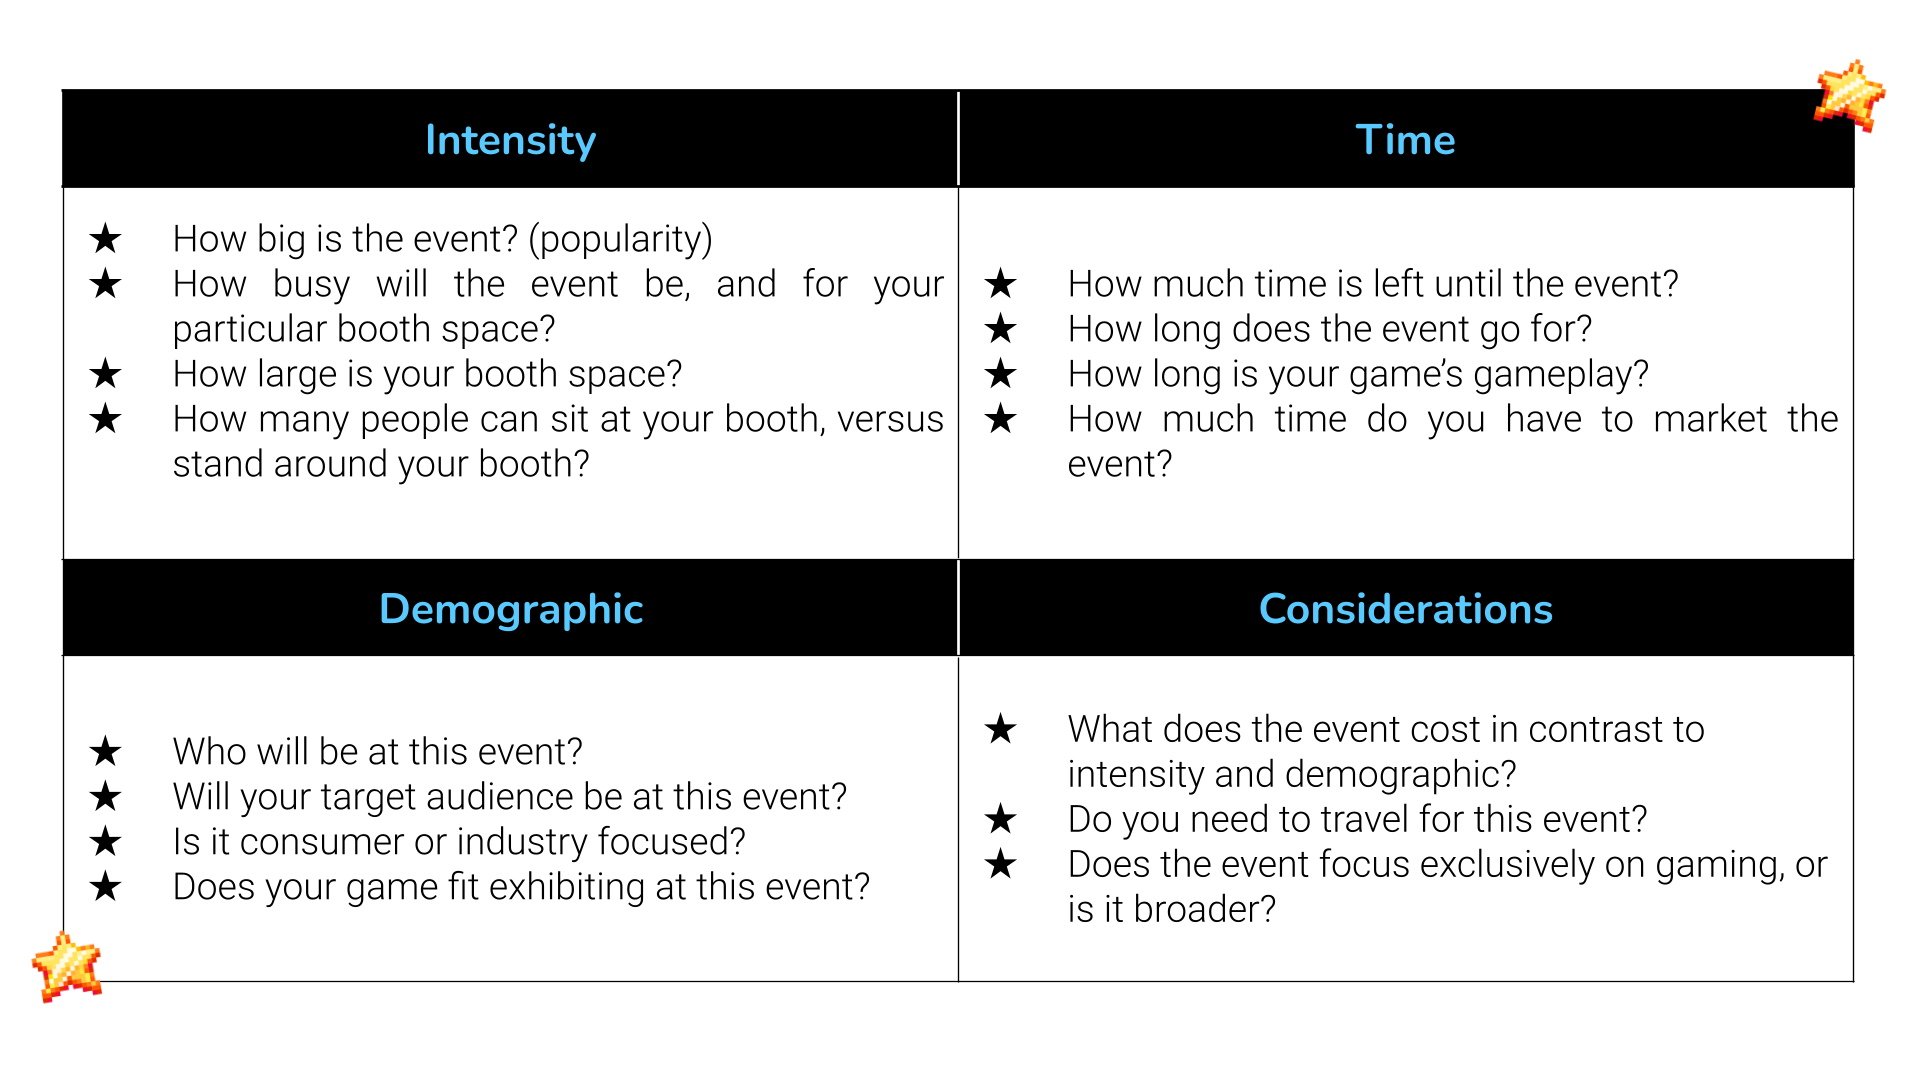
What is the scope of this event?
The event intensity, demographics, duration, and cost all inform the next layer.
Of course, everything starts with knowing who this event is catered to, how long until the event you have to prepare, and the intensity of the event. It goes without saying that if you’re spending $2000+ on a booth at PAX, Australia’s biggest gaming convention of the year… the amount of work that goes into the booth should reflect the expectation of convention goers.
Below are some questions you should be asking yourself, and find the relevant information for:
The First Layer:
What outcome(s) are you aiming for?
To make a tasty return at an event, you need to have a vision that drives you! You know what the details and capacity of this event are, you know your game and where you’re at, so now let’s make some good ol’ attainable KPIs that’ll help you manifest the best outcome.
Examples include a marketing beat, gaining wishlists, exposure, playtesting, or gathering data for publishers and funding applications.
The Second Layer:
What exhibition materials will reinforce your desired outcome?
You’ve asked yourself what you want out of this event, now you need a list of boothing materials to make it happen.
As a general suggestion, these are go-to materials to assist you in certain goals. Note that some exhibition materials might depend on you creating other materials—like merch or promotion platforms—in advance:

Pro Tip: The best way to determine what can help you achieve a certain outcome, is to put yourself in the shoes of your target demographic and identify what incentive would entice them to engage with your booth.
The Third Layer:
Prototyping the booth
By this point you should know your booth restrictions, like area, number of chairs, if you have access to signage, etc. You also have a list of physical materials you need to apply to your booth layout, to support your goals. But how do you know where to place all these items for the most optimal outcome?
You can get there by prototyping potential layout compositions using anything you’ve got: tissue boxes, books, tape measure, and anything that can help you visualise the space.
If you’re a first time boother, here are some tips to consider:
Measure, Measure, MEASURE!!!
Swear your loyalty to measuring tape and make sure you check your devices, printed materials, decor, and EVERYTHING else in accordance to your booth dimensions.
Prototype your set-up
Evaluate where to place your materials and decor. Do you prefer an asymmetrical layout or a more symmetrical design? The only way of knowing is by trying it out!
Alternatively, you can draw diagrams or use 3D models to help you plan your design.
Acknowledge designs might change
The sooner you plan, the more open and adaptable you can be to changes.
Space limitations and event rules may restrict you; creating a priority list for your materials is a good idea, in case you don’t have enough room.
Going in with a plan that may change is better than having no plan at all
The Fourth Layer:
Visualising the Consumer Experience
Planning your booth layout may very well be the hardest part of preparing for a showcase, since an inviting and effective layout can make all the difference… So here are some design principles that can transform your booth into a hook, line, and sinker!
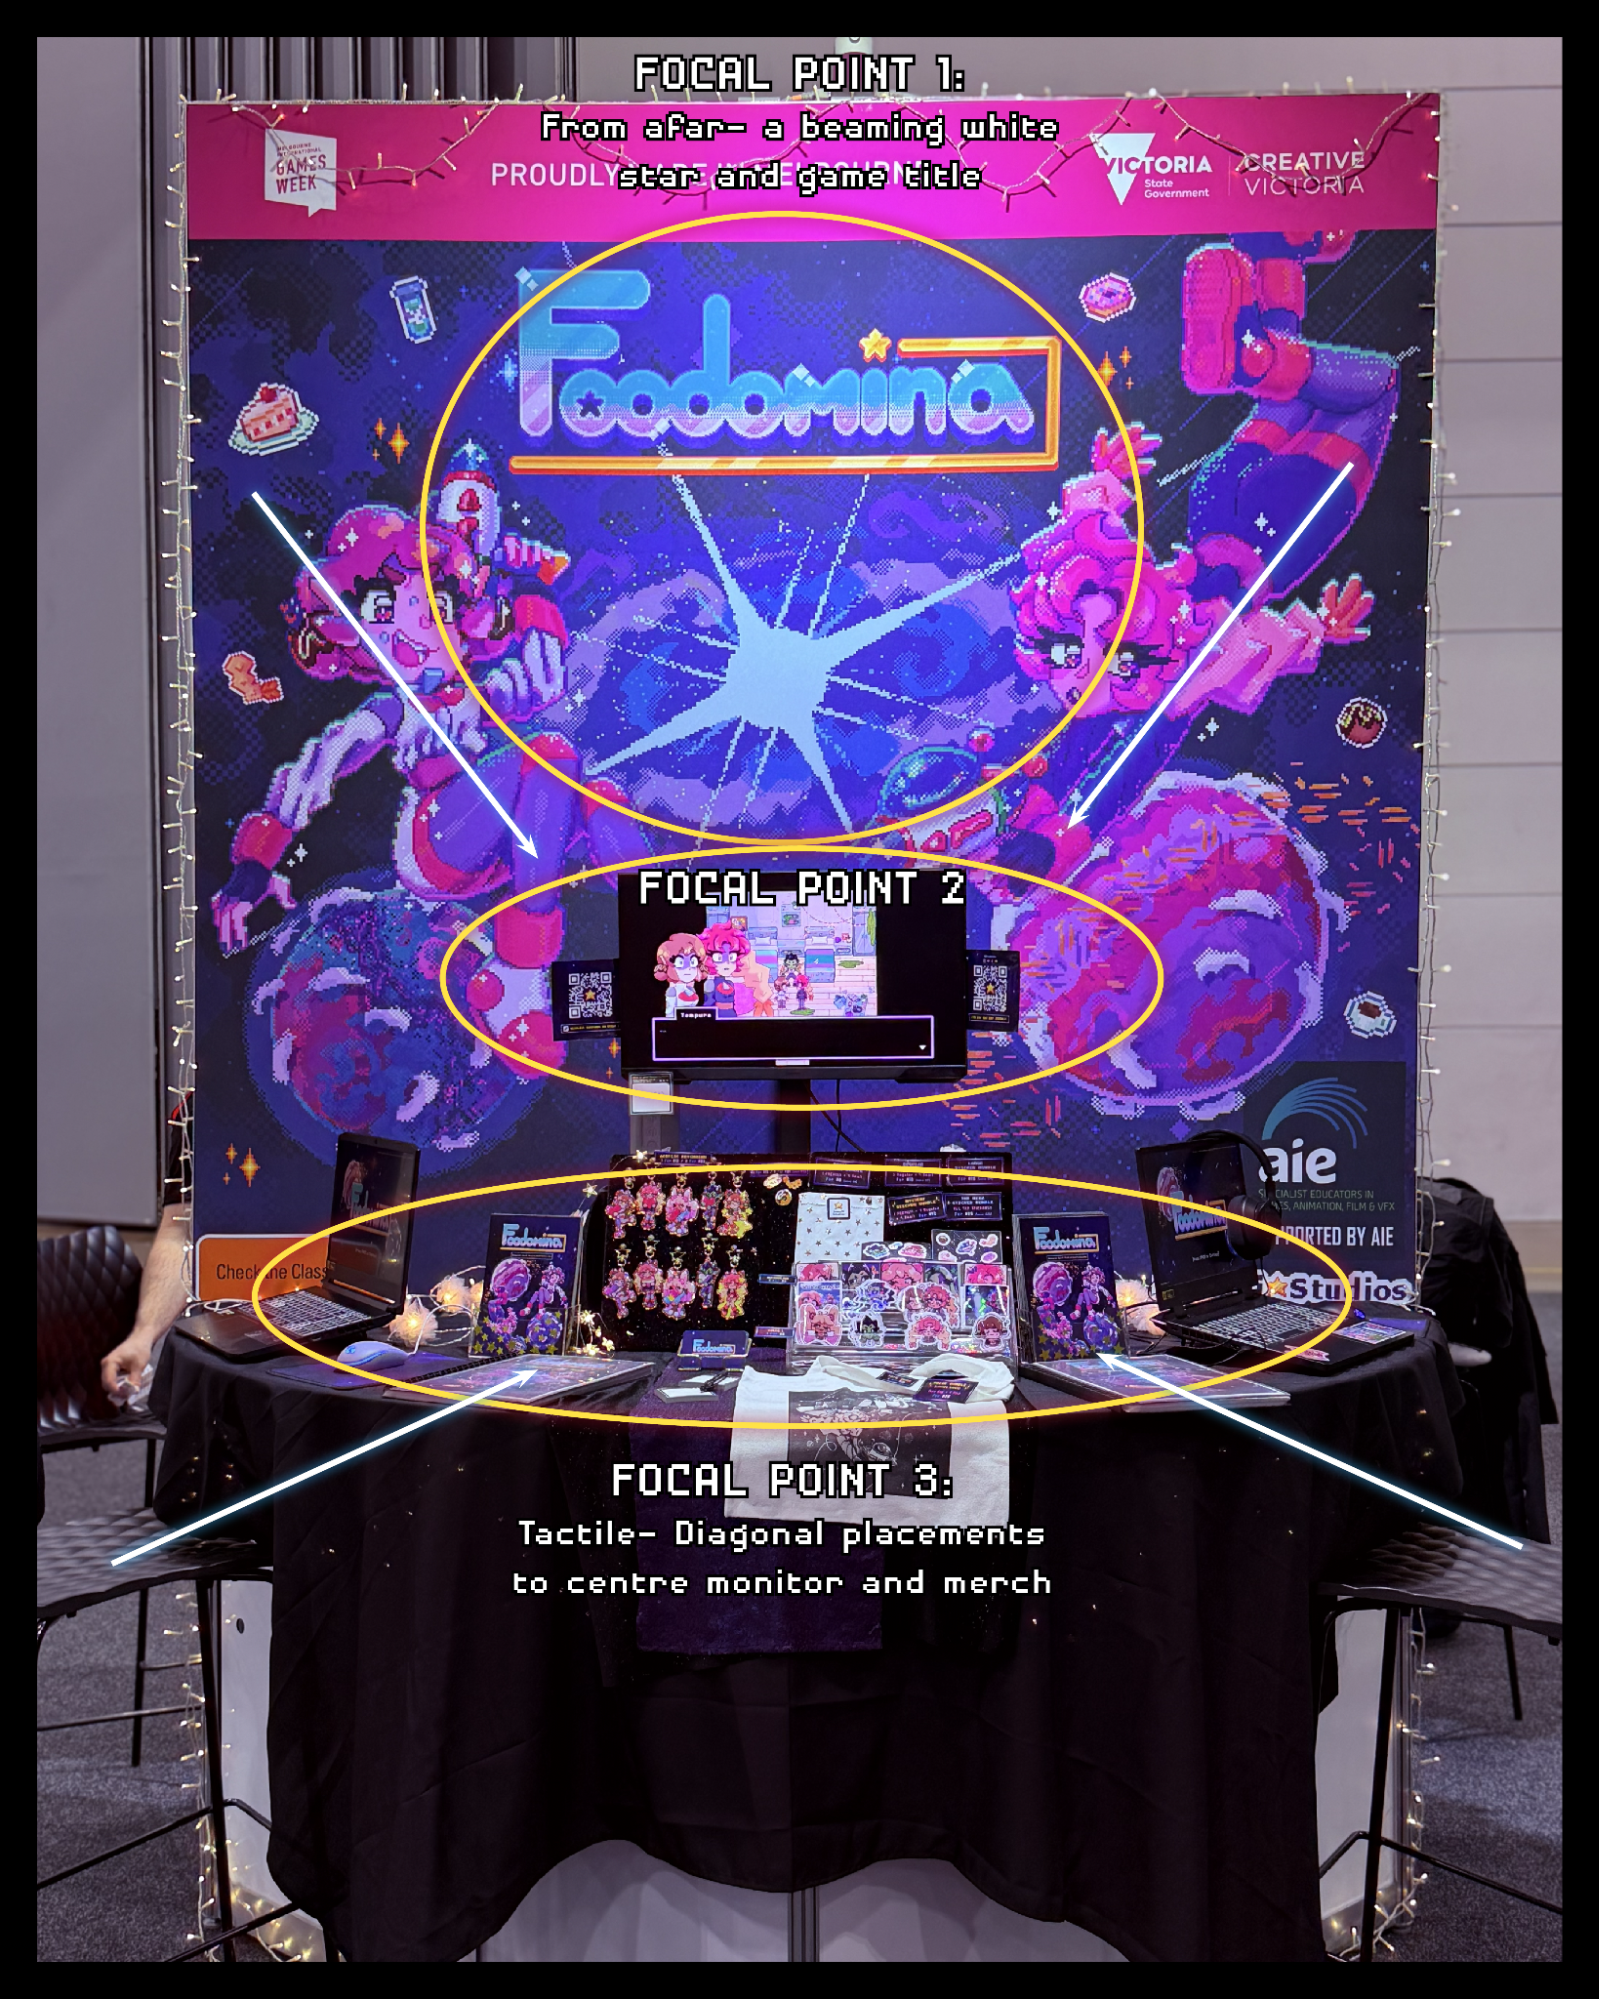
Let's put yourself in the shoes of a consumer and see how they might engage with exhibition materials, using Foodomina’s Indie Rising Booth as an example…
Long Distance and Close Distance Attractions:
Your booth must have two distinct methods of attracting consumers: something from afar and something tactile close-up. Awaken the primal foraging instinct in gamers with something interesting to look at and something that they can take with them!
This is best structured through…
Focal Point Tiers:
You should also take into account what you want consumers to look at first, second and third, to maximise your chance of them becoming a supporter or customer.
A good example of this is:
Something from afar: Eye catching signage with the game’s title and key art brings the consumer closer to learn more.
Something moving: Monitor showing gameplay or trailers can contextualise what the signage is about.
Something tactile: Business cards, sell sheets, merch, and more can provide them with a tactile way to engage with your game—especially if they can’t play it.
Leading Lines in Booth Design:
Using your different focal points, you should be able to visualise a leading line that directs the consumer from first spotting your booth all the way to engaging with it. This is your hook, line, and sinker framework.
You cannot assume the majority of consumers will follow that journey… However, you can influence it to be a more likely course of action by using leading lines in your booth design. Leading lines are used to encourage a viewer to subconsciously direct their eyes to a desired point. You can do the same with a booth.
The Fifth Layer:
Decor!
To bring your booth vision to fruition, you need decor.
You know your game best and, in turn, what colours, aesthetic, and props align with your game’s themes.
A good go-to for any booth includes LED lights of some kind to lure those gamers in like moths. Layering your tablecloths or having interesting designs on the table can also elevate your booth with very little effort!
If you’re struggling with decor ideas, props, or structures, this is where Pinterest, artist alley creators, and other developers are your best friend, because there’s plenty of examples to inspire you.
Pro Tip: Depending on your Booth guidelines, don’t forget to utilise VERTICAL space too.
The CORE:
Make that booth!
You’ve got a fortified, oniony plan for your booth now. All that’s left is to design those materials, manufacture them, purchase that decor, and be ready to set up your booth!
The great thing about going through these layers for one event is that, once you have that foundation, you’ll rarely have to return to start those layers from scratch again. Congratulations: You’ve just made yourself a booth design kit, fitted with exhibition materials and decor that are easily applicable and transferable to many other types of events.
Happy boothing!